Tuesday, July 19, 2011

harvest preserving: gazpacho

Tomato season is almost upon us! This week, we had our first handful of ripe, red tomatoes in the garden and I couldn't wait to use them! We've also had record heat, so what could be better than a simple, chilled gazpacho? I scoured the internet for recipes and found so many good ones that I couldn't decide which to make. I ended up pulling from a bunch, based on what we had available in the kitchen & garden, and winged it. It was easy to make and turned out quite tasty, so I'm glad I remember what I used! Later in the summer, when we hopefully have an abundance of tomatoes, this will also be good to make in large batches and freeze.


Gazpacho:

  • 6-8 tomatoes (blanched, peeled, & cored)
  • 1 red onion (peeled & chopped)
  • 1/4c chopped parsley (optional, we happen to have a ton growing)
  • 1 cucumber (peeled)
  • 1 sweet red pepper
  • 1 hot pepper (to taste, I grabbed an unmarked one from the garden & added bits at a time until it was hot enough for us)
  • 1/3c red wine vinegar
  • 1/3c olive oil
  • dash of hot sauce
  • salt & pepper to taste

Blanch the tomatoes: immerse them in boiling water for a short period (about 30 seconds), fish them out with a slotted spoon, and then immediately pop them into some cold water to stop them from cooking any further. Tomato skin should peel off easily.

Blend all ingredients in blender or food processor until pureed. Mix well and chill before serving. The longer it sits, the more the flavors develop. Garnish with whatever you like - our faves are sour cream, greek yogurt, or avocado - and serve!

Sunday, July 17, 2011

crossing the invisible line


We seem to have crossed some invisible line this year between gardening and homesteading. A realization that didn't even hit me until sometime in June when I saw how big all the plants were, realized we'd finally have enough tomatoes that by September I'd never want to see another one, and then saw the chickens running through the yard squawking with glee. Uhm, yeah, I think we crossed beyond gardening somewhere... and we love it! Keeping up with everything going on in the backyard is definitely a lot of hard work, but also very rewarding and deeply satisfying. In the process, however, we've started to neglect this blog and feel like we need a broader roof to include updates for all that's going on. Also, to be fair, "break into blossom" is probably a little too feminine for the postings of an equally divided homestead between Marc and I. ;)

That said, we've decided to start a new blog, but first, we need a name! The ones I lean to are a bit too cute/whimsical for him, and the ones he prefers sound too serious for me. We're attempting to find a balance between the two and a name that reflects the balance we strive for generally in our lives. We both have backgrounds in technology starting in the dot.com era, maintain day jobs, and are not likely to go "off grid" anytime soon. In fact, we learned how to do a large part of what we're doing via internet research and have been known to sit in the garden with an iPad trying to identify garden bugs. At the same time, we enjoy being outdoors digging in the dirt, constructing new projects, and the simple beauty & self-sufficiency of growing our own food.

So, to the handful of people who read our updates currently, and likely know us best, what do you think? Any good blog/homestead/farm name ideas popping into your mind? There's certainly a bunch of free produce (& future eggs) in it for you if we use your idea! :)

Meanwhile, we'll continue to post random, sporadic updates...

Thursday, June 9, 2011

is it that time already?

A. I can't believe it's already June!
B. I can't believe we already have cucumber beetles! (again.)

It seems early to be dealing with these guys, but it turns out they are right on time and we were the ones who were late last year. The good news is that our plants are pretty well established & we already have some cucumbers, so that helps get us a small step ahead of the beetle.


Last year the beetles and the squash bugs completely demolished all of our squash and cucumbers. Seriously, we got one cucumber. And not a single zucchini! I blame myself for not identifying them sooner, but hey - live and learn...

Speaking of identifying, here's what they look like:

photo from Illinois Fruit and Vegetable News

They're problematic not only because they chew on the leaves & fruit, but also, because they spread squash mosaic virus and transmit a bacteria that causes bacterial wilt in plants like cantaloupe, cucumbers, pumpkins, and butternut squash.

So, what do you do if you see these guys all over your plants? First, act fast! Last year, the bacterial wilt spread so quickly that we lost our cucumber plants in about 2 days. Once the plant is infected, there's no turning back the disease.

Here's what we've been doing to try to keep damage to a minimum:
  • Our first line of defense is companion planting. We surrounded the squash plants with borage and marigolds. The cukes are flanked with radishes, which may be the only reason we don't have even more beetles. This requires some planning ahead of time, but was high on our list of improvements this year.
  • We also moved all the cucurbits into cedar raised beds. We knew we had to move them to another locale in the yard either way because last year's infestation in the row garden was so bad, they were sure to spring up in the same spot this year looking for more. Hopefully the cedar will help deter the insects as well. 
  • Plant extras. If all of our squash & cucumber plants make it, we're going to have more than we know what to do with! We expect to lose some, but we're also expecting to make some pickles.
  • Beneficial bugs. Unfortunately, we didn't plan ahead enough for this one, but beneficial nematodes are recommended to help control the cucumber beetle and many other insects.
  • RELEASE THE CHICKENS! As soon as we noticed these little buggers, we grabbed our juvenile hens and dropped them in the garden bed. I tried to encourage them to eat the beetles instead of the cukes, but they're young and they distract easily, and ok... not really easy to train.
  • Remove & squish. This method is simple - if I see 'em, I squish 'em. But it's time consuming and not likely that I'll catch them all.
  • Neem oil. When we realized there were enough to warrant concern, we decided to break out the neem - mostly because it's what we have on hand & it's a good organic solution that doesn't harm beneficial insects. In our experience, neem works best as a control method rather than an eradication method. It's generally considered one of the safest organic pest solutions, but I checked with a local hatchery just to be sure it was ok to use around the chickens (especially since I just taught them it's ok to climb around and forage in there). They assured us that it is safe & non-toxic for the girls. Another treatment they suggested was food grade diatomaceous earth, which I've read is often used with chickens to prevent/treat mites & lice, and would certainly take care of the cucumber beetles. Should we need to go the eradication route, it's an option, but for now we seem to be staying ahead of them & will hopefully have a pickling party with our own cukes in a couple months. 

Monday, May 30, 2011

garden of greens

It's the end of May and our greens garden is flourishing! Last year, this was our only planting area and we had quite a few things here that didn't really have enough time to take off, or receive enough sun once they did. This year, we got ourselves in gear and started early with seed sprouting in the basement in February. This part of the yard gets a bit too much shade for veggies like tomatoes, eggplant, & peppers. It will work, but it will definitely take more time for everything to ripen. Since we have a new raised bed area in a very sunny spot this year, we decided to dedicate this space primarily to greens & early spring veggies and have most of the fruiting plants in the raised beds. 

By late March/early April our seedlings were hardened off & we were filling the space with brussels sprouts, broccoli, cauliflower, lettuce mixes, several kale, chard, & spinach varieties, onions, purslane, beets, herbs, and peas. The planning is finally paying off and my dream of having enough kale in the garden to make kale chips every day is finally being realized! :)

The kale in the back had overwintered & is bolting now, but the flowers are edible and very tasty!
Another lesson learned - we added straw between the rows, which we loved! Until we realized we should probably only add straw that hasn't gone to seed - as you can see, we grew a lot of grass. :) We've just replaced this with a weed tarp & some very nice cedar mulch.
Onions planted in late April.
Delicious summer lettuce mix. We've been able to harvest all our salads for a couple of weeks now & hope to keep it going through at least mid-summer.
Parsley & Purslane (p.s. if you haven't had it, purslane is delicious & has more omega 3 than any other leafy plant! we could never find it anywhere, so we decided to grow it ourselves)
Cauliflower is coming along well.
Spinach, lettuces mixes, and kale harvested earlier this week.

Thursday, April 28, 2011

mother nature does not care about our timelines.

We have a tendency to take on a lot of projects at once around here. Our list of outdoor projects for this season is quite optimistic:

  • Build 3 new 4x12 raised garden beds
  • Get chickens & build chicken coop
  • Run drip irrigation to the existing row garden & new raised beds
  • Run electricity to the backyard (for the coop & the greenhouse)
  • Have a 6' cedar fence installed
  • Put up a greenhouse
  • Build a seed starting system
  • Start about 1400 plants & put them into the gardens

Too ambitious? Crazy? Maybe... :) 

Mother Nature apparently did not get a copy of our project list & timeline. We have been doing pretty well with keeping up, even with the late snow & freezes in March. This month, however, has certainly been a lesson in patience. With the exception of one or two dry days, it has been a continuous forecast of rain. Projects are delayed, and the chicks are growing so quickly that they will likely outgrow Brooder 2.0 before we can build the coop!

Curry pokes her head out to see what we're doing.

It seems like just yesterday that Sesame was a tiny fluff ball hiding in the feather duster:

Sesame, 3/29/11

Look at her now, not even a month later!

Sesame, 4/24/11

We did find a nice day to stain the cedar 2x4s for the frame of the coop, so that's some progress! We did some research ahead of time on non-toxic and sustainable exterior treatments for the coop and decided to go with Penofin Verde. The downside of using this is that it's expensive (about $50 per gallon) and we had to order it because we weren't able to find it locally. The upside, so far, has outweighed it though. For a wood stain, it doesn't smell bad at all - in fact, because it's just brazilian rosewood oil, it actually smells kinda nice. It's also really beautiful on the wood and a little bit goes a lot further than we thought - we'll probably only need one gallon for the whole coop. We'll have to wait to see how it holds up in the weather, but at this point, we would likely use it again for future projects.


We're also bringing the chicks outside, as often as the weather will allow, and they are loving it!

Masala testing her wings
Curry leaping with joy


It looks like we may have some windows of sunshine in the coming days, so it's time to get the exact spot for their new home staked out and, weather permitting, have it built in the next week or two. Can't wait to see them enjoying their new home!

Sunday, April 3, 2011

chickens!

It's finally starting to feel like Spring around here and we have so much going on. After months of planning & anticipation, our baby chicks have arrived! We decided to enter into the adventure of chicken-keeping with an awesome couple who are also starting their backyard flock this year. This gives us two more brains for sharing ideas & concerns, four additional hands to help build the coop, and also provides a sense of community for the whole endeavor.

The chicks have arrived!
The brooder box was amazingly simple to build out of things we already had around the house. We just used a plastic file box and lined the bottom with paper towels. We had some modular wire cubes from another project, so we drilled holes around the top of the bin and secured a panel to one side with cable ties. On the other side, we attached a second panel to the first, creating a hinged lid to open & close as needed. We just use a clamp to hold it in place when closed (mostly to keep the curious cat out). Add a red 100 watt infrared light and a thermometer, and we're ready for the chicks!

Plastic tote brooder box
All set up on a table in our home office

We split an order for day-old baby chicks from a reputable online hatchery and received 8 total - a flock of 4 for each of us. In retrospect, I don't think we would mail order chicks again - especially now that we've found some local sources. For me, the issue is more with the shipping process than the hatchery. Certainly, chicks are shipped all the time and can handle it, but I'd rather not see them put through the stress if there is a local option available. 

Additionally, of the 8 we ordered, one of them unfortunately didn't make it. Sadly, it was our Buff Orpington. For me, this was a very early lesson to not get too attached to them since losing chickens, whether as babies or adults, seems all too common. There have been several existential conversations between the four of us with regard to pet vs. livestock, "egg layer" vs. "egg-laying family member", and the foreboding question of what happens when they stop laying. I'm aiming for something between pet and provider because, let's face it, I'm never going to see them as livestock. As a child, I screamed with delight every time we passed cows on the highway and even once tried to hug one (the cow was not amused). I also kissed a llama at the zoo when I was 5, or rather it kissed me, and I've adored them ever since. And don't even get me started on the goats at Grant's Farm...
Call me Snow White.
Our hope is that we can provide a happy, well-balanced chicken life for them in which they have joy, freedom, and respect - and in return we have entertaining companions, awesome garden pest control, and beautiful, delicious eggs without having to worry about what food recall is currently going on.

We had been kicking ourselves a bit for not starting with a flock of 6, so we took the opportunity while our chicks were still young to add 3 more from a local hatchery. They have all settled in together really nicely and are pure joy to watch. :)

Here is our current flock!

Sesame, Barred Plymouth Rock (6 days)
Saffron, Rhode Island Red (6 days)
Masala, Easter Egger (6 days)
Anise, Black Star (3 days)
Curry, Buff Orpington (3 days)
Tamarind, New Hampshire Red (3 days)

Thursday, March 3, 2011

seed starting in soil blocks

It seems like lately there are tons of posts out there about making soil blocks, and rightfully so, because they are pretty awesome. Hopefully, we can add a bit to the knowledge pool through our own experience trying them out this year.

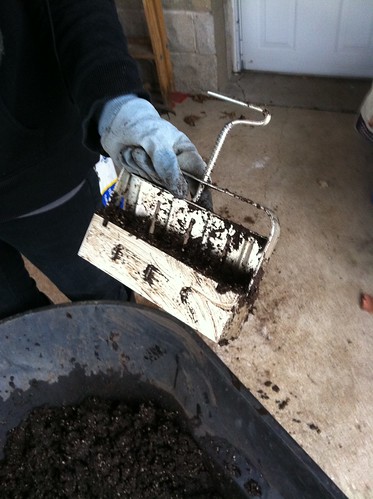
For those that aren't familiar with the soil block maker,  it's a simple molding tool that creates compressed, self contained blocks of soil complete with dimples on the top to drop seeds in. Ours came from Johnny's Selected Seeds, but there are plenty of places online that carry them.

Soil block maker

Initially, we spent an obscene amount of time reading articles & watching videos on the subject (as we do with most projects ;) before deciding that we wanted to give this a try! Although it is certainly more effort, we're happy we decided to go this route because it provides so many advantages, not just to the plant, but to our pocketbook & the environment as well.  

Some of the reasons we chose to use this method include:
  • Elimination of root bound transplants
    The blocks have a bit of open air between them which allows for air pruning. Basically, the roots reach the edge of the block & stop there instead of twisting around and getting root bound. 
  • Reduced transplant shock
    Transplanting is much easier on the plant with this method because there's minimal disturbance to the root system, which gives it a running start once it hits the garden.
  • Sustainability & Reduced cost
    Eliminates waste & the need to buy pots or other containers. When you're starting a large amount of seeds, as we are, it's more economical than buying countless bags of germination mix and biodegradable pots. 
  • Control of your germination mix
    Using soil blocks, you can still choose to use a pre-made germination mix. However, after reading the ingredients of many of the affordable mixes, we found most contain only peat moss & perlite with no added nutrients from compost or fertilizer. We chose to mix our own so the seedlings would have plenty of phosphorus, nitrogen & potassium from the start for fast, healthy growth and higher yield.

Here's a few videos that helped us:
   Front Porch Farm: http://www.youtube.com/watch?v=k2m8-hfhtDU
   SF Urban Farmers: http://www.youtube.com/watch?v=PltQYV1oqec

    The recipe we're using for our starter mix came from Front Porch Farms (we divided it in half for smaller batches):
    • 5 gallons organic peat moss
    • 1/4 cup lime
    • 2.5 gallons course perlite
    • 2.5 gallons organic compost 
    • 2.5 gallons water (add more if needed)
    • Fertilizer blend: 2 cups blood meal, 2 cups phosphate, 2 cups green sand
    This makes about 4-5 trays with 50 soil blocks per tray, so 200 total of 2"x2" blocks.

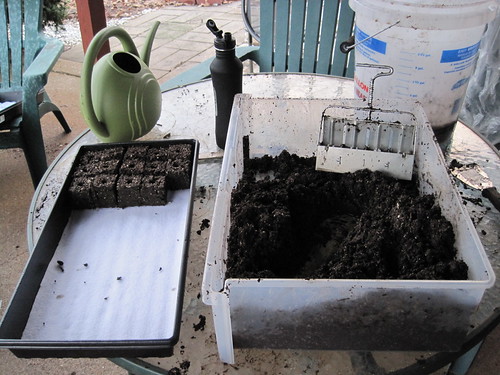
    Making soil blocks
    Ready to fill the trays!

    We prefer working with the soil blocks over the peat pellets and small plug flats we used last year. They're easier to move from tray to tray if needed, the dimple for the seed is nicely sized, which makes sowing easier, plus, we can fit more per tray. And they look like little brownies!

    We took a cue from Front Porch Farms and also covered our seeds with a bit of vermiculite instead of soil. This helps retain moisture and makes it easy for the little sprout to break through once it's ready to meet the light.
    Filling the seed simples with vermiculite

    First four trays ready!
    Some things we learned along the way:
    • Add water to the starter mix gradually
      It took a bit for us to get this right. You want it to be about the texture of oatmeal. A good way to judge is to squeeze a handful of soil - some water should come out, but not a ton.
    • Don't try to make the blocks in a wheelbarrow...
      unless you want a serious backache. We found it much easier to move the soil into a small, flat bottomed container & make the blocks at waist height.
    • Wear a dust mask when adding the perlite & if possible, buy it in bulk
      Perlite can cause respiratory irritation and is super dusty, so always better to wear a mask. We also try to buy all these components in bulk to save a bit, but the perlite especially gets expensive in smaller bags. If you're in the St. Louis area, OK Hatchery has a ginormous 4 cubic ft. bag for around $20. (compared to $7 for 8oz at Lowe's)
    • Use solid bottom seed starting trays
      If you plan to start these indoors under lights, we recommend an enclosed tray instead of the open bottomed ones. We found out the hard way that the blocks dry out pretty quickly under lights & misting isn't sufficient to keep them moist. Plus, with our seed starting system, we don't like the idea of water splashing around 500 watts of light fixtures. Not cool. We've since moved everything over to enclosed trays with DIY capillary mats, which we'll probably be posting details about in the near future.
    On a side note, we used Espoma Plant-Tone in place of the fertilizer blend in our first batch of starter mix, thinking, "same difference, right?" It appeared to have the necessary ingredients, but we overlooked it's lower nitrogen percentage compared to blood meal. In theory, this could result in slower plant growth. We'll see soon enough, but so far they're looking great!

    Lettuce, spinach, chard & kale - started 2.20


    Thursday, February 24, 2011

    jump starting spring: seed starting station

    We've been hyper-focused on getting seeds started this week and making improvements from our slightly sad, leggy seedlings of last year. Our first task this spring was to do some research and decide how we wanted to set up a dedicated seed area. I really have to give Marc the credit on this one. He did many hours of research, went back and forth on what type of bulbs to use several times, and then diligently hunted down all the supplies. He also played a large part in relaying the technical details for this post. He's awesome like that. :)

    Last year, we had a modest set up consisting of two folding tables and two shop light fixtures that used Plant & Aquarium bulbs. I think we only did about six trays of seedlings, and it was mostly effective, but not ideal - especially for the amount we're doing this year. In retrospect, we realize now that the legginess of our plants was caused by the fact that the light was positioned a bit too high. We've since found that, ideally, you want the light to be no more than 2"-3" above the seedlings. Each light fixture, under the best conditions, puts out about 6,000 lumens - compared with the midday sun, which measures about 100,000 lumens (!!!) - so really, the more light the better!

    We were also total slaves to marketing on the whole "Plant & Aquarium bulb" thing. These types of bulbs tend to be lower in lumen output and heavy in the red spectrum. That's very useful for blooming flowers, but for seedlings, the key seems to be the blue spectrum with high lumen output. Seedlings prefer a cooler light temperature (around 6500k) that promotes fast, stocky growth. Our research also revealed a heated online debate about mixing a warm & cool bulb together to create a wide spectrum vs. just using a full spectrum, high lumen output bulb. After a good deal of consideration, we opted for the latter since it seems to be producing the best results for others.

    While we were brainstorming, I showed Marc this nifty set up from Gardener's Supply Company with an equally nifty price tag:


    If you can afford it, this looks like it would be a great system to use and seems to have everything you need to get going. However, I'm lucky to have a handy boyfriend who's interested in this as much as I am and who's first reaction was, "$600? Seriously? I can build something like that in a day or two; and for 1/4 the price." Again, awesome like that.

    After a picking the features we liked from other set ups and making a few revisions, we decided to build our system using the following:
    • 5 tier wire shelf from Lowe's (it needed to be powder-coated to avoid rust & have shelves at least 18" deep to fit our standard 20" seed trays)
    • (8) T-8 fluorescent light fixtures (2 fixtures per shelf, 2 bulbs per fixture) We almost went with T-12's but, luckily, found the more energy efficient T-8's for the same price
    • (16) Daylight Deluxe 6500k bulbs at 2850 lumen each, so 11,400 lumens per shelf (A variety of manufacturers make these, so you should be able to find them at Home Depot, Lowe's, or similar store.)
    • (2) Emergency Space Blankets (the kind you use for camping or emergency kits) We hung one on each side of the shelf unit for light reflectivity and heat retention. These are very effective & also make me feel like I'm in a sci-fi movie every time I check on the seeds. (bonus.) You could also use aluminum foil, or any other reflective material to increase the light.
    • (4) inexpensive outdoor thermometers (one for each shelf)
    • Power strip with 8 outlets
      Hanging fixtures
    Installing lights

    Lights installed & space blanket hung

    Completed seed station!
    Using this set up, we are able to exceed the lumen output of most of the commercially available seed starting systems out there and for way less money. The whole set up supports 16 trays of starts for approximately $150. We're super excited to fill these shelves in the coming weeks & see how well it works for us!

    Monday, February 21, 2011

    doing it wrong

    One of our primary reasons for taking the time to document what we are doing with the garden is to learn from our own mistakes & to share the experience as we go. In looking back at last year, there were lots of things that could have been done better and would have likely given us a more successful garden, but at the same time, one of the most beautiful things about gardening is that it's pretty hard to really mess it up. Sure, you can plant your seeds too deep, you may not have the perfect soil or the perfect light, or you may not recognize a destructive bug in time to save a plant (we have been guilty of all of the above! :)... but in the end, nature finds a way to create something amazing, despite everything you've "done wrong", and you learn how to improve it next time. It becomes less a case of "good vs. bad" ideas and more a case of "better, and even better than that".

    2010 Garden space - Dug & fenced in April/May, so we were a bit late for transplanting

    Basil & Tomatoes - 2010 Garden


    Lessons Learned
    (I am a project manager, remember... ;)

    • Research, research, research!
      Last year, we jumped in eagerly without much research or a clear plan of everything we would plant, when we should start them, & where they might grow best. We both had gardens before, but not quite on this scale or with the goal of significantly increasing how much of our overall food consumption comes from our own yard. This year, we are planning out what we're growing in a super-duper spreadsheet that would make any project manager beam with organizational joy. Including ideal & actual seed-starting and transplant dates, companion plants & those to avoid, specific info on each variety, and anything else we wanted to see at a glance. Yes, it's even color-coded. *swoon*
      Ours is probably overkill for most, but there are some great online resources for this:
      Skippy's Vegetable Garden calendar: http://bioarray.us/Skippy's%20planting%20calendar.html
      You Grow Girl's seed chart:
      http://www.yougrowgirl.com/2006/03/31/the-lazy-gardeners-seed-starting-chart/
      Johnny's seed calculator: http://www.johnnyseeds.com/e-PDGSeedStart.aspx
    • Map it out
      It's hard to believe that little tomato start will be 8ft tall, or that the zucchini (assuming it avoids the plague of squash bugs) can become a jungle of vines that creates too much shade for another plant. But, it happens... and faster than expected. We are using online planning software to map things out a bit this year & hopefully that will help. We are planning to use this one: http://www.growveg.com/gardenplanner/gardenplanner.html
    • Give them a good start
      After lots of research, tips from fellow bloggers, and many hours of YouTube videos, we decided to try building our own seed-starting station with a standard 5 tier wire shelf from Lowe's, shop lights, & fluorescent bulbs. We also opted to make our own soil mix and try using soil cubes this year. We're very excited about this project and it's been really fun so far! Photos & details to follow soon!
    • Relax and enjoy the process
      Ok, I will admit this can be a challenge for me, especially in the planning stages! :) I find myself getting anxious about the timeline (again, curse of the project manager) and wanting to jump to the next task before we finish the one we're on. I actively remind myself not to rush and to learn to live with imperfections (wabi-sabi, baby!). At the end of the day, all the planning in the world isn't going to stop a frost or a very determined group of cucumber beetles. Perhaps the biggest lesson I've learned from gardening is that I am definitely not in control. But, as I watch seeds sprout from tiny little pods, or how a certain plant attracts a very specific insect for pollination, I'm grateful for the reminder to let go and simply enjoy being a part of this interconnected process.

    Saturday, February 12, 2011

    garden v2.0

    Our first seed order of the season arrived and we are so excited to get going for Spring! Our entire backyard still looks like a frozen tundra, but we are busy indoors mapping out all of our new plans for garden expansion and chicken residence. We have also both come to the conclusion of "who needs a yard?" ... ok, it was actually more like, "f*** the yard. what's it doing for us??" We made the decision that I think a lot of people have - that we, and the environment, would be better served by landscaping most of the yard with edible & native plants - plus no one really wants to mow. ;) It's not going to be a one-season job, but at least we have an evolving plan to inspire us now!


    Our first seed order is from Johnny's Seeds and we're anxious to try them for the first time. Most of them are vegetables that we picked up at the Farmer's Market last summer and loved.
    • Borage - This one was recommended as a companion plant for the tomatoes and squash, but is also a great attractor of pollinators. After last year, we need all the help we can get with controlling squash bugs. Please feel free to send any suggestions! Bonus: the flowers are edible! Hello, pretty salads. :)
    • Cippolini Gold Coin Onions - I tried these for the first time last summer in a canning class and loved them. This will be our first attempt at onions, so we'll see how that goes.
    • Romanian Sweet Peppers
    • Yard Long Red Noodle Beans - another market find last year. These are great in stir fry!
    • Carmen Peppers - I have Deep Mudd Farm to thank for my addiction to these. Yum.
    • Sun Gold Tomatoes - another highly addictive market find. These brought us back every week and we ate them like candy. Best cherry tomato I've ever had!

    Speaking of seeds, if you are in the St. Louis area, there is a fun seed swap event coming up with Drop.Swap.Grow! I will be traveling that day, but the awesome boyfriend will be there with seeds for swapping.